|

-
Senior Member

hi all...
Still tyring to mess with this DARNED swift 3D again.
Couple questions:
1. What is the CREATE PLANE option for? Is this for floors? and walls and stuff?.....I dont really understand how to use the lathe/extrusion editors either.
2. I am (thought I was at least) trying to mess with the camera options...thinking that this was the key to making an animation that that moves around an object. Example. I have some text..that is sitting in place and just spinning. I wantto be able to circle this spinning object..with that on=bject being the focus of attention..always in the center..and then maybe circle to the top... I hope I am explaining it right.lol
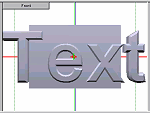
3.If there a way to make it so objects have raised text on their surfaces? And is there a way to change the dimension of an object?..Like say I click on square..can I change the height/width and most imposrtantly the DEPTH of that square (object)??
Geez,,,,I have so many more...but I will stick with these for now. Are these things even possible in SWISH?
Please explain in the most basic of terms please....am not to comfortable with the LINGO of SWIFT yet. Soon..I swear.....but I only get limited time wit it since it is new..and I need to be working on projects with programs I already know...like FLASH..lol...Thanks.
-whispers-
P.S. I will be up for a while still (5:00 a.m. here) central time...so reply so I can stop being bored right now...and before I decide to finally go t bed....lol
-whispers-
-
supervillain

hi there whispers... I was intending on making a visual tutorial for you - however, I'll be leaving in a few hours, so I'm typing this as I pack.
1. planes: used mostly for either giving your object a place to cast a shadow, or to "crudely" create a photographer's backdrop. That way, you could place your objects in a "room", or such.
2. I'd suggest using a target camera. create your animation on your text first. then, create the target camera. it should autofit your text, if not, when you select the camera, you can change it's lens from 50mm, to whatever will capture your text/object. Now, change one of your windows to Camera01. Now, hit animate... I normally use even number frames - say 40 frames - then while the Camera view is active, I move the camera to the first place I moved the timeline - my first keyframe. Then repeat for the second, and third and fourth. Guess I'm used to moving 360 degrees around an object in 3D in quadrants.
3. to have like text raised on their surface... unfortunately, without 3DS Max, say like a extruded label or so... well, you could do one of two things. One... the hardest would be to hand lay each and every letter. Especially hard if you introduce curved surfaces. The second... think ahead with your *.eps and/or *.ai files. you could think ahead, and basically create an outline of an object or text...
I'll be honest. I may have interpreted this one wrong.
here are some Swift3D 2.0 files and the exported *.swf's as well. I would post the *.swfs as well... but I'm about out of here. Take it easy... and I hope that helps.
btw, I tried to not use any lingo that was confusing. I just used what was either on the buttons, or when you hover over a button within Swift3D. These are not the best tuts, trust me - done in 5 minutes while packing and talking on the phone - but I hope they somewhat help a bit.

-
" Lets Rock ! ....... "

Hi Whispers,
To raise text on a surface simply make a box ( which you can resize using the scale settings once you
1) select the object you want to resize (a list of options appears top left of screen)
2) select 'scale' and change the x, y, and z numbers and you will see you box change shape accordingly.)
Then type out your text by selecting the 'Text ' button and then replacing the word text with your own letters in the window on the left of the screen midway down ( hey! you said you wanted it simple  ) )
Now by using both front view and top view of the work areas, you position the text so it just sticks out from the box. By beveling the text, you will get a better finish. Change the background color and add some color to the box and text and you start getting a nice finish - mess with the angles too - always good to show off the depth.

For animation, the target camera is the one you want to be using. Click on the target camera button  then click on the little top left rectangle in the movie area that says 'Front' and a drop down menu of cameras comes up. then click on the little top left rectangle in the movie area that says 'Front' and a drop down menu of cameras comes up.

Click on 'Camera1'. Now you are looking thru camera1 - a target camera - at the stage. So, imagine this camera is strapped to your head - where-ever you go and whatever you look at is what gets shown in the finished product. So while in anything BUT the 'camera1' view - click on the blue camera in the work area and it turns red. Now you can drag it around. You can also twist/angle it by dragging the arrow in the trackball area ( bottom left of screen ) and make the camera tilt over (just like leaning left or right). By clicking on the 'pivot' crosshair you can drag what the centre of the target camera's view is! To see the results, switch back to the 'camera1' view.
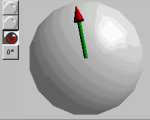
By clicking the animate button, and then clicking the frame line at, say 20 and moving the camera1, ( from any view BUT camera1 view) you will see swift create the animation of it moving from one spot to the other. Try it - play it. See how it works? Now click further along the timeline and move the camera more and repeat several times - to move it up or down select a different view in the second work area window and drag the camera up or down, back and forth - get crazy! 
I usually keep the left window in 'target camera' view and the right window I change consantly to move the camera as I need.

Once your happy with it - render and export - then import to flash , drop some groovy music in it and your done. ( not allowed to post sound on f/k )
[swf width="200" height="150" background="#000000"]http://users.esc.net.au/~nitro/demo/whispers/crazycam.swf[/swf].
[Edited by NitroCharged on 04-13-2002 at 01:12 AM]
-
Senior Member
WOW-..thaks for the tips..unfortunatly....I am VERY new to SWIFT....and this is above my head.  I will try to follow your steps..but I do not really understand them fully! I do appreciate the time though....maybe if any of you have some basic tuts you would like to share?? It would help. I will try to follow your steps..but I do not really understand them fully! I do appreciate the time though....maybe if any of you have some basic tuts you would like to share?? It would help.
gerbick- Your link didnt work for me! Thanks for trying though!
I did add some text the way you were saying...by just adding the text over a square..and scaling..it seemed to work ok..for now...I just need to learn more LINGO and just get familiar with the interface I suppose...
DAMN...
-whispers-
-
" Lets Rock ! ....... "
maybe you should tell me what you want to do and I will make a no frills tut to suit.
-
Senior Member
I dont really have any SET effect in mind. I just dont even know the TOOLS / EFFECTS SWIFT is capable of. Once I have a better understanding of that I guess I can think of an effect I would like to create. Looks like I need to do some more reading
Maybe this:
Just basically have a rotating object the "C" for example....then you just spin/rotate around it (while it is "spinning" itself)on its horizontal plane. Doing a 360 around the spinning object..so you can "look" behind it..ya know.
My next stop (when I get better...) it to learn how to have to a 360 around an object/area with the center point object always having its fornt facing the camera while it is doing 360...(hard to explain as I am new)
The "IDEA" of these camera options..and functions...baffle me! I am not understanding at all...only thing I can do is creat an object (one from the SLIM selection at top) and then add a preset rotation....through a color in ther too...but even thats sketchy..
lol
SO where ever you think I should head next in my jedi SWIFT traing you let me know...maybe a few exercises to teach me the ways of SWIFT...(Wax-On Wax-Off..)
Thanks
-whispers-
-
" Lets Rock ! ....... "
OK, if this doesn't do it, your holiday to the happy farm is gonna come early in life!
I have made a simple visual demo here as an example, to see if it understandable and in a format that is appealing to the masses. ( nothing fancy yet, just nuts and bolts - I will tidy up if it is of any use) Feedback is a must, please.
-
Senior Member
-
supervillain
whispers... I gave you the wrong url:
http://gorillafarm.net/swf/quick_tut.zip
per usual... great job NitroCharged 
-
" Lets Rock ! ....... "
-
Senior Member
Gerbick...no biggie..looking at what ya zipped now..well at least DL'ing it! lol
Thanks
NitroCharged-...ahh...I see..Yeah that format is GREAT I use those when I make my tuts for FLASH...(you all can check them out if you like...and tell me what ya think about them)
Sure am looking forward to your tutorials... I am messing with SWIFT right now as a matter of fact..if you would like to see what you have inspired so far...just say so!
-whispers-
 Posting Permissions
- You may not post new threads
- You may not post replies
- You may not post attachments
- You may not edit your posts
-
Forum Rules
|
Click Here to Expand Forum to Full Width

|


 Reply With Quote